K8s Configmap 挂载避免符号链接
在 k8s 中挂载 configmap 时,默认情况下,会以符号链接的形式存在。
在某些场景下,如 Pod 挂载 .ssh 进行免密时,由于.ssh的特殊权限,因此不能以符号链接的形式存在,否则不能 ssh 免密。
此时,可以使用 subpath 进行挂载。
在 k8s 中挂载 configmap 时,默认情况下,会以符号链接的形式存在。
在某些场景下,如 Pod 挂载 .ssh 进行免密时,由于.ssh的特殊权限,因此不能以符号链接的形式存在,否则不能 ssh 免密。
此时,可以使用 subpath 进行挂载。
当系统与 Yarn 集成时,一般会通过 YarnClient / AdminProtocol 以及 Restful 接口等方式跟 Yarn 通信。
那么,当系统在进行单元测试时,就需要对 Yarn 进行 Mock,来验证系统的正确性。
Yarn 提供了 MiniYarnCluster 来建立内存级的集群进行测试,但其也有一些局限性。
当磁盘满负荷时,希望能够降低读写的速率,避免 HDFS 进程卡住,整个HDFS 不可用,导致 Client Socket 异常,作业失败。
当前(2023.12.18,HDFS 3.4 版本):
dfs.client.congestion.backoff.mean.time、dfs.client.congestion.backoff.max.time控制写入拥塞时 Client 的等待时间,用dfs.pipeline.congestion.ratio 来控制 DataNode 被判断阻塞时的跟CPU核数的比率。在 K8s 中,官方说明 ConfigMap 整体作为卷被 Pod 挂载时,会自动更新。从 ConfigMap 更新到新键映射到 Pod 的总延迟可能与 kubelet 同步周期(默认为1分钟)+ kubelet 中 ConfigMap 缓存的 TTL(默认为1分钟)一样长。
官方说明可以通过更新 Pod 的一个注解来触发立即刷新。
Helm 3的应用在升级时,会根据三路合并策略去决定如何对 Resource 进行升级。
假设某个 Helm Applicaion 定义了 ConfigMap,在安装的时候会在 K8s 创建对应资源,但是后续运维人员会根据生产环境情况去动态修改该 ConfigMap 中的内容,并且希望在 Application 升级的时候,对该 ConfigMap 不进行升级(即不能修改生产环境的配置内容),该如何配置 Helm Application 的 Charts 内容呢?
Go 中的 Atomic Values 等价于 C++ 的顺序一致性 atomics,等价于 Java 中的
volatile变量;
在看 Go 中 sync.once包中的源码实现时,疑问为什么要用atomic的 load 和 store,而不能直接读取和赋值。
用于识别 Feat, Fix, Test 等特性。
Git-Commit-Best-Practices这个项目总结了一个最基本的 git commit 实践:
Angular项目,可以很方便的生成Release Notes
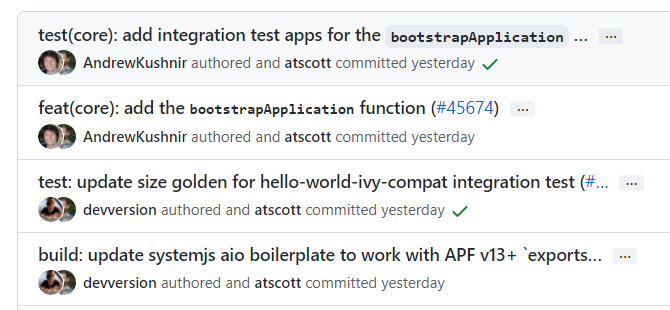
commit 基本格式如下:
type用于说明 commit 的类别,只允许使用下面 7 个标识:
feat:新功能(feature)fix:修补 bugdocs:文档(documentation)style: 格式(不影响代码运行的变动)refactor:重构(即不是新增功能,也不是修改 bug 的代码变动)test:增加测试chore:构建过程或辅助工具的变动ci :CI 相关的改动perf :性能提升的代码改动(不新增功能)通常feat和fix会被放入 changelog 中,其他(docs、chore、style、refactor、test)通常不会放入 changelog 中。
scope用于说明 commit 影响的范围,可选值。通常是文件、路径、功能等。
subject是 commit 目的的简短描述,不超过 50 个字符。
Body部分是对本次 commit 的详细描述,可以分成多行。
Footer 部分只用于两种情况:
Break Changes:不兼容变动Closes:关闭Issue示例:
在git commit的hook中加入commitlint检测,不符合 commit 规范的提交在本地就无法提交进去。
# 1. 安装commitlint命令行和验证使用的规则config-conventional
npm install -g @commitlint/config-conventional @commitlint/cli

# linux shell 或者 windows git-bash环境执行echo命令
# 2.1 单个项目的配置文件,每个项目可以配置不同的commit lint规范
echo "module.exports = {extends: ['@commitlint/config-conventional']}" > commitlint.config.js

# 2.1 全局commitlint.config.js配置windows下暂时不知如何配置

# 3. 验证最新一条提交记录(必须添加上述配置,否则需要加上 -x "@commitlint/config-conventional")
commitlint -e

# 3.2 检查信息是否符合配置(linux shell 或者 windows git-bash)
echo "your commit message" | commitlint
git-cz 是一个简化版的commitizen+cz-conventional-changelog组合,提供了开箱即用的功能,默认使用Angular规范,默认模板不填写scope部分内容。
# 安装git-cz包
npm install -g git-cz

# 以后所有使用git commit的地方都用git-cz或git cz命令提交代码
# 交互式使用,兼容git commit 的参数,比如-a, --amend
git cz
NodeJS 项目直接使用 husky:
安装@commitlint/cli和@commitlint/config-conventional这两个包(建议安装到全局,这样所有项目都可以用):
然后在 package.json 添加 husky 配置:
{
  "husky": {
    "hooks": {
      "commit-msg": "commitlint -x @commitlint/config-conventional -E HUSKY_GIT_PARAMS"
    }
  }
}
然后使用git commit会触发husky的hook,检测commit记录是否符合规范。
其它项目,手动添加 git hook,仍然使用husky
# 全局安装husky
npm install -g husky

# 1. 安装commitlint命令行和验证使用的规则config-conventional
npm install -g @commitlint/config-conventional @commitlint/cli
项目中初始化husky配置
# husky 对项目进行初始化,创建目录.husky目录和脚本husky.sh
husky install

# 添加commit-msg hook,执行`npx commitlint --edit $1` 命令,对commit message进行检验
husky add .husky/commit-msg "commitlint -x @commitlint/config-conventional --edit $1"

# 可选,如果不用-x @commitlint/config-conventional,则需要项目中配置commitlint.config.js文件
# echo "module.exports = {extends: ['@commitlint/config-conventional']}" > commitlint.config.js文件
执行git commit时(注意空格),会进行命令输出
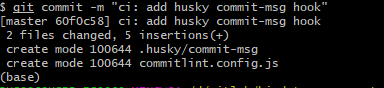

删除 husky 和 git hook
第4部分内容是在开发本地做的,因此需要禁止开发人员删除hook。
在 gitlab ci 中运行以下命令检测当前提交是否符合 conventional-changelog 规范:
image: node:latest

stages:
  - test

compile_job:
  stage: test
  script:
    - npm install "@commitlint/cli" "@commitlint/config-conventional" "commitlint-format-junit"
    - npx commitlint -x @commitlint/config-conventional -o commitlint-format-junit -f ${CI_COMMIT_BEFORE_SHA} > commitlint_result.xml
  artifacts:
    name: "$CI_JOB_NAME-$CI_COMMIT_REF_NAME"
    reports:
      junit: commitlint_result.xml
$CI_COMMIT_BEFORE_SHA 是 gitlab ci 的内置变量;将 lint result 输出为 Junit 格式,方便 Gitlab 在 merge request 的时候展示 lint 失败的结果,如下图所示。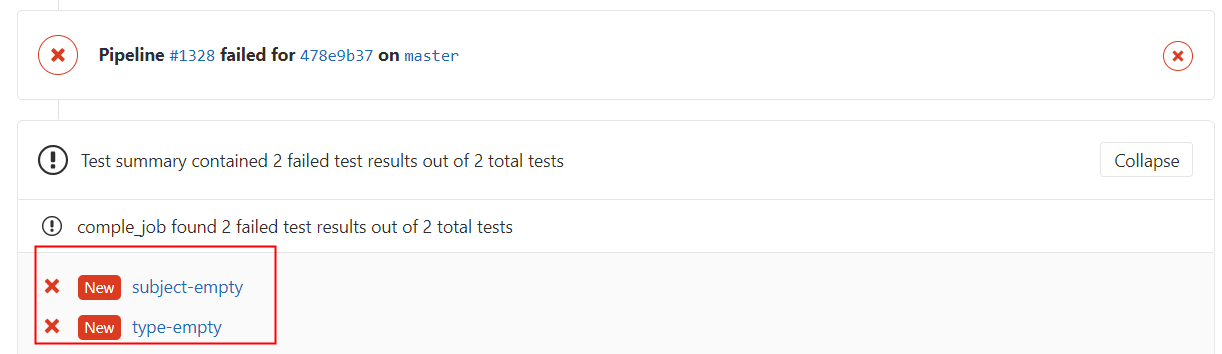
更适合在 CI 环境中运行,自带支持各种 git server 的认证支持,如 Github,Gitlab,Bitbucket 等等,此外,还支持插件,以便完成其他后续的流程步骤,比如自动生成 git tag 和 release note 之后再 push 回中央仓库,自动发布 npm 包等等。
大致的工作流如下:
release note,打 git tagCHANGELOG.md,npm publish等等(通过插件完成)npm install -g @semantic-release
版本号更新的逻辑:只有 feat 和 fix 提交才会触发版本升级
BREAKING CHANGE: 提交将会升级主版本号,版本由1.2.0升级到了2.0.0https://github.com/semantic-release/semantic-release/blob/master/docs/usage/ci-configuration.md#authentication
Gitlab 仓库需要配置 GL_TOKEN or GITLAB_TOKEN
| Step | Description |
|---|---|
| Verify Conditions | Verify all the conditions to proceed with the release. |
| Get last release | Obtain the commit corresponding to the last release by analyzing Git tags. |
| Analyze commits | Determine the type of release based on the commits added since the last release. |
| Verify release | Verify the release conformity. |
| Generate notes | Generate release notes for the commits added since the last release. |
| Create Git tag | Create a Git tag corresponding to the new release version. |
| Prepare | Prepare the release. |
| Publish | Publish the release. |
| Notify | Notify of new releases or errors. |
analyze commits with conventional-changelog
preset使用 angular 形式的commit规范;generate changelog content with conventional-changelog
通过conventional-changelog插件,生成从上个release到现在的变更信息。
preset使用 angular 形式的commit规范;Create or update a changelog file in the local project directory with the changelog content created in the generate notes step.
创建或更新changelog文件(默认路径为 CHANGELOG.md)
@semantic-release/git和@semantic-release/npm共用,则其位置必须在最前面。skip ci commit 信息跳过 CI )['CHANGELOG.md', 'package.json', 'package-lock.json', 'npm-shrinkwrap.json']配置,.releaserc
{
  "plugins": [
    ["@semantic-release/git", {
          // 配置哪些文件会被 add 推送回仓库
          "assets": ["Dockerfile", "./build/userservice.yaml","./build/version.md", "CHANGELOG.md"],
          // 自定义 commit 信息的格式
          "message": "chore(release): ${nextRelease.version} [skip ci]\n\n${nextRelease.notes}"
     }
    ],
  ]
}
publish a GitLab release
默认会通过 CI_API_V4_URL内置的环境变量识别 Gitlab 的地址
{
    "plugins": [
        "@semantic-release/commit-analyzer",
        "@semantic-release/release-notes-generator",
        "@semantic-release/changelog",
        "@semantic-release/git",
        ["@semantic-release/gitlab", {
            "assets": [
                {"path": "README.md", "label": "CSS distribution"}
            ]
        }]
    ]
}
assets 字段
| Property | Description | Default |
|---|---|---|
path |
Required, unless url is set. A glob to identify the files to upload. |
- |
url |
Alternative to setting path this provides the ability to add links to releases, e.g. URLs to container images. Supports Lodash templating. |
- |
label |
Short description of the file displayed on the GitLab release. Ignored if path matches more than one file. Supports Lodash templating. |
File name extracted from the path. |
type |
Asset type displayed on the GitLab release. Can be runbook, package, image and other (see official documents on release assets). Supports Lodash templating. |
other |
filepath |
A filepath for creating a permalink pointing to the asset (requires GitLab 12.9+, see official documents on permanent links). Ignored if path matches more than one file. Supports Lodash templating. |
- |
execute custom shell commands.
配置(.releaserc)
{
  "plugins": [
    "@semantic-release/commit-analyzer",
    "@semantic-release/release-notes-generator",
    ["@semantic-release/exec", {
      "verifyConditionsCmd": "./verify.sh",
      "publishCmd": "./publish.sh ${nextRelease.version} ${branch.name} ${commits.length} ${Date.now()}"
    }],
  ]
}
生命周期
| Step | Description |
|---|---|
verifyConditions |
Execute a shell command to verify if the release should happen. |
analyzeCommits |
Execute a shell command to determine the type of release. |
verifyRelease |
Execute a shell command to verifying a release that was determined before and is about to be published. |
generateNotes |
Execute a shell command to generate the release note. |
prepare |
Execute a shell command to prepare the release. |
publish |
Execute a shell command to publish the release. |
success |
Execute a shell command to notify of a new release. |
fail |
Execute a shell command to notify of a failed release. |
update version strings throughout a project.
修改特定文件中的版本号信息。
配置
{
  "plugins": [
    "@semantic-release/commit-analyzer",
    [
      "@google/semantic-release-replace-plugin",
      {
        "replacements": [
          {
            "files": ["foo/__init__.py"],
            "from": "__VERSION__ = \".*\"",
            "to": "__VERSION__ = \"${nextRelease.version}\"",
            "results": [
              {
                "file": "foo/__init__.py",
                "hasChanged": true,
                "numMatches": 1,
                "numReplacements": 1
              }
            ],
            "countMatches": true
          }
        ]
      }
    ],
    [
      "@semantic-release/git",
      {
        "assets": ["foo/*.py"]
      }
    ]
  ]
}
说明:
semantic-release 是最后进行执行,因为会需要将CHANGELOG等变更文件推回 git 仓库;semantic-relase 执行镜像跟项目的构建镜像不会是一个镜像;因此:
semantic-release 的dry模式,区分release/snapshot,先生成版本号;semantic-release 变更文件推回git仓库,并创建 Git Tag;.releaserc配置commit-analyzer, release-notes-generator, npm, github,{
"plugins": [
"@semantic-release/commit-analyzer",
"@semantic-release/release-notes-generator",
"@semantic-release/changelog",
"@semantic-release/git"
]
}
.gitlab-ci.yml 配置(gitlab-runner运行环境为powershell)# lint 过程用于检测 commitlint 结果
# release 过程用于自动化产生 git tag 和 CHANGELOG.md
stages:
- lint
- build
- deploy
- release
commitlint:
stage: lint
# node:lts 镜像并包含 npm install -g @commitlint/cli @commitlint/config-conventional commitlint-format-junit
# @semantic-release @semantic-release/gitlab @semantic-release/git @semantic-release/changelog @semantic-release/exec
image: ${GIT_NODE_IMAGE}
script: |
if [ "${CI_COMMIT_BEFORE_SHA}" = "0000000000000000000000000000000000000000" ]; then
npx commitlint -x @commitlint/config-conventional -f HEAD^
else
npx commitlint -x @commitlint/config-conventional -f "${CI_COMMIT_BEFORE_SHA}"
fi
echo "===${CI_COMMIT_REF_NAME}===${CI_COMMIT_BRANCH}"
# --dry-run 模式,预先生成版本号,区分 release / snapshot
if [ "${CI_COMMIT_REF_NAME}" == "master" ]; then
npx semantic-release --dry-run --no-ci
echo "VERSION_VAR=`cat VERSION`" > build.env
cat build.env
else
echo "VERSION_VAR=SNAPSHOT-`cat VERSION`-`date "+%Y%m%d-%H%M%S"`" > build.env
cat build.env
fi
# 通过环境变量传递版本号
artifacts:
reports:
dotenv: build.env
build:
stage: build
image: ${MKDOCS_IMAGE}
# 构建版本制品,并上传制品库
script:
- mkdocs build
- ls -all ./
- tar -zcvf helpdoc-${VERSION_VAR}.tar.gz site
- curl -v --user 'admin:admin123' --upload-file helpdoc-${VERSION_VAR}.tar.gz http://172.16.1.217:8081/repository/static/helpdoc/helpdoc-${VERSION_VAR}.tar.gz
artifacts:
paths:
- helpdoc-*.tar.gz
expire_in: 1 hour
deploy:
stage: deploy
# 通过 SSH 部署到机器
image: ${SSHPASS_IMAGE}
script:
- sshpass -p ${NODE_125_PASSWD} scp -o StrictHostKeyChecking=no helpdoc-${VERSION_VAR}.tar.gz root@${NODE_125_IP}:/tmp
- sshpass -p ${NODE_125_PASSWD} ssh -o StrictHostKeyChecking=no root@${NODE_125_IP} "cd /tmp && rm -rf site && tar -zxvf helpdoc-${VERSION_VAR}.tar.gz && rm -rf /home/experiment/web_ai_education/nginx/html/help/ && mv site /home/experiment/web_ai_education/nginx/html/help/ && cd /home/experiment/web_ai_education/nginx/ && ./sbin/nginx -s reload"
release:
stage: release
image: ${GIT_NODE_IMAGE}
script:
# 生成版本号,更新CHANGELOG,并推回仓库
- npx semantic-release
only:
- master
dependencies: []
效果图示例(master分支构建流水线):

70w 在线人数的弹幕系统
带宽压力
假如说每3秒促达用户一次,那么每次内容至少需要有15条才能做到视觉无卡顿。15条弹幕+http包头的大小将超过3k,那么每秒的数据大小约为8Gbps,
通过查阅资料,http gzip压缩比率可以达到40%以上(gzip比deflate要高出4%~5%)
弹幕的 Response 结构简化,降低传输字节数
内容排列顺序优化,将字符串和数字内容放在一起摆放,增加压缩比;
频率控制
带款控制:通过添加请求间隔参数(下次请求时间),保证客户端的请求频率服务端可控
根据了解腾讯云的弹幕系统,在300人以下使用的是推送模式,300人以上则是采用的轮训模式。
促达机制,推送 vs 拉取
Long Pulling
减少轮询次数,低延迟,浏览器兼容性较好
服务器需要保持大量连接
WebSocket:
较少的控制开销(相对于 HTTP 请求每次都要携带完整的头部),更强的实时性;
每个客户端使用一个持久化的连接
Long Polling 能发现连接异常的最短间隔为:\(min(keepalive\_intvl, polling\_interval)\)
Websockets能发现连接异常的最短间隔为:\(min(keepalive\_intvl, client\_sending\_interval)\)
弱网情况下 Websockets 其实已经不能作为一个候选项
即使 Websockets 服务端已经发现连接断开,仍然没有办法推送数据,只能被动等待客户端重新建立好连接才能推送,在此之前数据将可能会被采取丢弃的措施处理掉;(没有缓存/入库?)
在每次断开后均需要再次发送应用层的协议进行连接建立。
将逻辑较为复杂、调用较少的发送弹幕业务与逻辑简单、调用量高的弹幕拉取服务拆分开来。
拉取弹幕
数据更新的策略是服务会定期发起RPC调⽤从弹幕服务拉取数据,拉取到的弹幕缓存到内存中
缓存:按照时间进行分片(采用 RingBuffer),最多保留60秒的数据,只保留了尾指针,它随着时间向前移动,每⼀秒向前移动一格
读请求:缓冲环会根据客户端传入的时间戳计算出指针的索引位置,并从尾指针的副本区域往回遍历直至跟索引重叠,收集到一定数量的弹幕列表返回
写操作是单线程,读和写是相反的方向,⽽决定读和写的位置是否出现重叠取决于index的位置,
保证读操作最多只能读到30秒内的数据,因此缓冲环完全可以做到无锁读写
发送弹幕
用户一定时间能看得过来弹幕总量是有限
对弹幕进行限流,有选择的丢弃多余的弹幕
将 gitlab, nginx, postgres, redis 都运行在一个镜像中
docker run \
    --detach \
    --publish 8090:8090 \
    --publish 222:22 \
    --name gitlab \
    --restart unless-stopped \
    -v /mnt/gitlab/etc:/etc/gitlab \
    -v /mnt/gitlab/log:/var/log/gitlab \
    -v /mnt/gitlab/data:/var/opt/gitlab \
    gitlab/gitlab-ce
hostname 来生成的,也就是容器的id。作为gitlab 服务器,我们需要一个固定的 UR L访问地址,于是需要配置 gitlab.rb(宿主机路径:/mnt/gitlab/etc/gitlab.rb)# 配置http协议所使用的访问地址,不加端口号默认为80
external_url 'https://192.168.199.231:8090'
# 配置ssh协议所使用的访问地址和端口
gitlab_rails['gitlab_ssh_host'] = '192.168.199.231'
gitlab_rails['gitlab_shell_ssh_port'] = 222 # 此端口是run时22端口映射的222端口
#保存配置文件并退出
:wq
docker restart gitlab
gitlab-ctl status 查看对应的服务,是否有不停重启的服务,进而查看服务日志。
unicorn一直重试,
docker exec -it gitlab rm /opt/gitlab/var/unicorn/unicorn.pid && docker restart gitlabhttps://forum.gitlab.com/t/error-502-failed-to-start-a-new-unicorn-master/29790
https://github.com/sameersbn/docker-gitlab
拆分为 gitlab, postgres, redis 三个镜像,通过 docker compose 启动;
docker容器安装gitlab时,需要先进入到容器中
docker exec -ti gitlab /bin/bash
gitlab-ctl reconfigure
gitlab-ctl restart
gitlab-ctl status
gitlab-ctl stop
gitlab-ctl tail
gitlab-ctl stop unicorn
gitlab-ctl stop sideki
Gitlab-runner 安装:更好的管理方式是k8s
docker run -d --name gitlab-runner --restart always \
    -v /mnt/gitlab-runner/config:/etc/gitlab-runner \
    -v /var/run/docker.sock:/var/run/docker.sock \
    gitlab/gitlab-runner
docker run --rm -t -i -v /mnt/gitlab-runner/config:/etc/gitlab-runner gitlab/gitlab-runner register \
  --non-interactive \
  --url "http://172.16.1.181:8090/" \
  --registration-token "DA1wNdAchnBFH_frXa9N" \
  --executor "docker" \
  --docker-image alpine:latest \
  --description "docker-runner" \
  --tag-list "docker,test"
如果出现了no route to host异常,需要在宿主机上添加端口防火墙(原因见docker章节No Route to Host 问题)
Helm 安装:GitLab Runner Helm chart | GitLab Docs
需要在项目中创建 .gitlab-ci.yml 文件,下面是个示例,其中tags是创建gitlab-runner时指定的tags,匹配上才会有runner执行CI:
image: maven:latest
stages:
  - build
  - test
  - run
variables:
  MAVEN_OPTS: "-Dmaven.repo.local=.m2/repository"
cache:
  paths:
    - .m2/repository/
    - target/
build:
  stage: build
  script:
    - mvn $MAVEN_CLI_OPTS compile
  only:
    - master
  tags:
    - test
test:
  stage: test
  script:
    - mvn $MAVEN_CLI_OPTS test
  only:
    - master
  tags:
    - test
deploy:
  stage: deploy
  script:
    - echo "deploy over..."
  only:
    - master
  tags:
    - test
Branch pipelines that run for Git push events to a branch, like new commits or tags.
Tag pipelines that run only when a new Git tag is pushed to a branch.
Merge request pipelines that run for changes to a merge request, like new commits or selecting the Run pipeline button in a merge request’s pipelines tab.
Scheduled pipelines.
| Variables | Branch | Tag | Merge request | Scheduled |
|---|---|---|---|---|
CI_COMMIT_BRANCH |
Yes | Yes | ||
CI_COMMIT_TAG |
Yes | Yes, if the scheduled pipeline is configured to run on a tag. | ||
CI_PIPELINE_SOURCE = push |
Yes | Yes | ||
CI_PIPELINE_SOURCE = scheduled |
Yes | |||
CI_PIPELINE_SOURCE = merge_request_event |
Yes | |||
CI_MERGE_REQUEST_IID |
Yes |
表示构建工作,即某个 Stage 里面执行的工作。一个 Stage 中可定义多个 Jobs
默认,相同 Stage 中的 Jobs 会并行执行
相同 Stage 中的 Jobs 都执行成功时,该 Stage 才会成功
如果任何一个 Job 失败,那么该 Stage 失败,即该构建任务失败
可以通过needs字段改变执行顺序。
stages:
    - stage-1
    - stage-2

job-1:
    stage: stage-1
    needs: []
    script:
      - echo "job-1 started"
      - sleep 5
      - echo "job-1 done"

job-2:
    stage: stage-1
    needs: []
    script:
      - echo "job-2 started"
      - sleep 60
      - echo "job-2 done"

job-3:
    stage: stage-2
    needs: [job-1]
    script:
      - echo "job-3 started"
      - sleep 5
      - echo "job-3 done"

job-4:
    stage: stage-2
    needs: [job-2]
    script:
      - echo "job-4 started"
      - sleep 5
      - echo "job-4 done"
GitLab CI/CD 预先定义的变量:https://docs.gitlab.com/ee/ci/variables/predefined_variables.html
.gitlab-ci.yaml中定义变量:
variables为{}表明不需要全局变量;variables:
GLOBAL_VAR: "A global variable"
job1:
variables:
JOB_VAR: "A job variable"
script:
- echo "Variables are '$GLOBAL_VAR' and '$JOB_VAR'"
job1:
variables: {}
script:
- echo This job does not need any variables
create a new environment variables in a job, and pass it to another job in a later stage.
build-job:
  stage: build
  script:
    - echo "BUILD_VARIABLE=value_from_build_job" >> build.env
  artifacts:
    reports:
      dotenv: build.env

test-job:
  stage: test
  script:
    - echo "$BUILD_VARIABLE"  # Output is: 'value_from_build_job'
https://docs.gitlab.com/ee/ci/caching/
cache是用来指定 jobs 之间可以缓存的文件和目录
Locally defined cache overrides globally defined options;
不同的 key 下的缓存也不会相互影响;
cache 在同一个项目的不同的 pipeline 之间也实现共享;
不同的项目不能共享 cache;
如果整个 pipeline 配置全局的 cache,意味着每个 job 在没有特殊配置的情况下会使用全局的配置
对整个 job 的 cache 禁用
默认的配置是 cache:policy 中的 pull-push 策略:
示例:maven项目配置缓存
image: nnntln/3.6.1-jdk-8:latest

variables:
   MAVEN_OPTS: -Dmaven.repo.local=/cache/maven.repository
cache:
   key: PortalReportBackend
   paths:
     - /root/.m2/repository

stages:
  - build
  - execute

build:
  stage: build
  script: /usr/lib/jvm/java-8-openjdk-amd64/bin/javac Hello.java
  artifacts:
    paths:
     - Hello.*

execute:
  stage: execute
  script: /usr/lib/jvm/java-8-openjdk-amd64/bin/java Hello
Use artifacts to pass intermediate build results between stages.
- Subsequent jobs in later stages of the same pipeline can use artifacts.
- Different projects cannot share artifacts.
- Artifacts expire after 30 days by default. You can define a custom expiration time.
- The latest artifacts do not expire if keep latest artifacts is enabled.
- Use dependencies to control which jobs fetch the artifacts
artifacts is used to specify a list of files and directories which should be attached to the job when it succeeds, fails, or always.
The artifacts will be sent to GitLab after the job finishes and will be available for download in the GitLab UI.
expire_in字段;job artifacts
https://docs.gitlab.com/ee/ci/pipelines/job_artifacts.html
job 的制品,可以在 Pipeline界面进行下载
Keep artifacts from most recent successful jobs
By default artifacts are always kept for successful pipelines for the most recent commit on each ref.
expire_in字段影响;Keep the latest artifacts for all jobs in the latest successful pipelines
By default the artifacts of the most recent pipeline for each Git ref are locked against deletion and kept regardless of the expiry time.
Pipeline artifacts
Pipeline artifacts are different to job artifacts because they are not explicitly managed by .gitlab-ci.yml definitions.
Pipeline artifacts are used by the test coverage visualization feature to collect coverage information.
默认情况下
3次 pipeline webhook(pending -> running -> succeed)
open a MergeRequest 触发一次 webhook,action 为 opened, "merge_status": "preparing",
没有 pipeline id,此时只能生成链接,点击查看
approve a MergeRequest 触发一次 webhook, action 为 approved
merge Request 的时候,state 变成 merged ,action 为 merge
close merge request 时,state 变成 closed ,action 为 close
https://docs.gitlab.com/ee/topics/release_your_application.html
https://docs.gitlab.com/ee/user/clusters/agent/gitops.html
- Moved from GitLab Premium to GitLab Free in 15.3
通过在 K8s 集群部署 Agent,监听
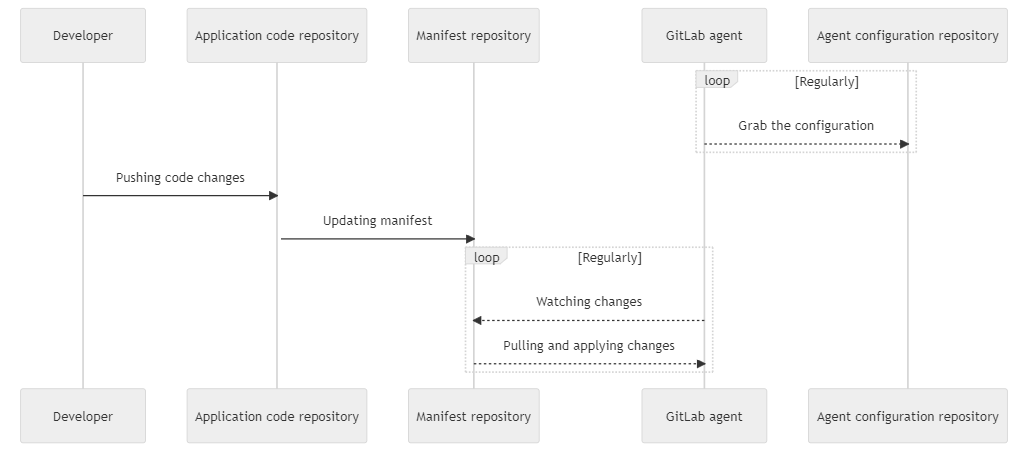
https://docs.gitlab.com/ee/user/clusters/agent/ci_cd_workflow.html
- Moved to GitLab Free in 14.5.
直接在.gitlab-ci.yml中选择Agent的K8s context 并运行 kubectl命令,部署到 K8s 环境