Maven 自定义仓库
当自己开发一个工具包,然后另一个项目要引用时,因此需要将 jar 包放到可访问的公网上:
-
Maven 官方 repo,如使用 Sonatype OSSRH,但其注册复杂,此次不进行介绍;
-
第三方公共仓库,如 JitPack, Github/Gitee等,后面进行介绍。
当自己开发一个工具包,然后另一个项目要引用时,因此需要将 jar 包放到可访问的公网上:
Maven 官方 repo,如使用 Sonatype OSSRH,但其注册复杂,此次不进行介绍;
第三方公共仓库,如 JitPack, Github/Gitee等,后面进行介绍。
MPI Operator 在执行 MPI 作业时,通过 SSH 的方式,因此需要在不同的 MPI Workers Pod间配置免密。
本文通过源码分析,探究如何在 K8s Pod 间配置免密。
在 k8s 中挂载 configmap 时,默认情况下,会以符号链接的形式存在。
在某些场景下,如 Pod 挂载 .ssh 进行免密时,由于.ssh的特殊权限,因此不能以符号链接的形式存在,否则不能 ssh 免密。
此时,可以使用 subpath 进行挂载。
当系统与 Yarn 集成时,一般会通过 YarnClient / AdminProtocol 以及 Restful 接口等方式跟 Yarn 通信。
那么,当系统在进行单元测试时,就需要对 Yarn 进行 Mock,来验证系统的正确性。
Yarn 提供了 MiniYarnCluster 来建立内存级的集群进行测试,但其也有一些局限性。
当磁盘满负荷时,希望能够降低读写的速率,避免 HDFS 进程卡住,整个HDFS 不可用,导致 Client Socket 异常,作业失败。
当前(2023.12.18,HDFS 3.4 版本):
dfs.client.congestion.backoff.mean.time、dfs.client.congestion.backoff.max.time控制写入拥塞时 Client 的等待时间,用dfs.pipeline.congestion.ratio 来控制 DataNode 被判断阻塞时的跟CPU核数的比率。在 K8s 中,官方说明 ConfigMap 整体作为卷被 Pod 挂载时,会自动更新。从 ConfigMap 更新到新键映射到 Pod 的总延迟可能与 kubelet 同步周期(默认为1分钟)+ kubelet 中 ConfigMap 缓存的 TTL(默认为1分钟)一样长。
官方说明可以通过更新 Pod 的一个注解来触发立即刷新。
Helm 3的应用在升级时,会根据三路合并策略去决定如何对 Resource 进行升级。
假设某个 Helm Applicaion 定义了 ConfigMap,在安装的时候会在 K8s 创建对应资源,但是后续运维人员会根据生产环境情况去动态修改该 ConfigMap 中的内容,并且希望在 Application 升级的时候,对该 ConfigMap 不进行升级(即不能修改生产环境的配置内容),该如何配置 Helm Application 的 Charts 内容呢?
Go 中的 Atomic Values 等价于 C++ 的顺序一致性 atomics,等价于 Java 中的
volatile变量;
在看 Go 中 sync.once包中的源码实现时,疑问为什么要用atomic的 load 和 store,而不能直接读取和赋值。
用于识别 Feat, Fix, Test 等特性。
Git-Commit-Best-Practices这个项目总结了一个最基本的 git commit 实践:
Angular项目,可以很方便的生成Release Notes
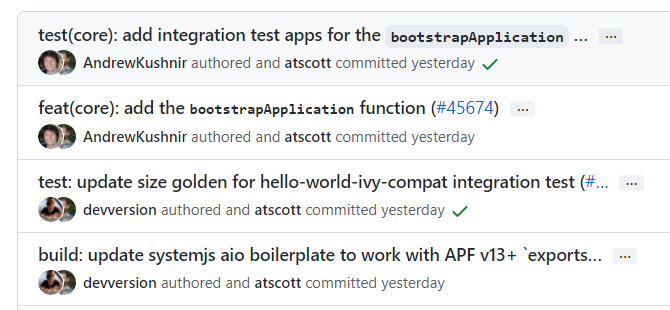
commit 基本格式如下:
type用于说明 commit 的类别,只允许使用下面 7 个标识:
feat:新功能(feature)fix:修补 bugdocs:文档(documentation)style: 格式(不影响代码运行的变动)refactor:重构(即不是新增功能,也不是修改 bug 的代码变动)test:增加测试chore:构建过程或辅助工具的变动ci :CI 相关的改动perf :性能提升的代码改动(不新增功能)通常feat和fix会被放入 changelog 中,其他(docs、chore、style、refactor、test)通常不会放入 changelog 中。
scope用于说明 commit 影响的范围,可选值。通常是文件、路径、功能等。
subject是 commit 目的的简短描述,不超过 50 个字符。
Body部分是对本次 commit 的详细描述,可以分成多行。
Footer 部分只用于两种情况:
Break Changes:不兼容变动Closes:关闭Issue示例:
在git commit的hook中加入commitlint检测,不符合 commit 规范的提交在本地就无法提交进去。
# 1. 安装commitlint命令行和验证使用的规则config-conventional
npm install -g @commitlint/config-conventional @commitlint/cli

# linux shell 或者 windows git-bash环境执行echo命令
# 2.1 单个项目的配置文件,每个项目可以配置不同的commit lint规范
echo "module.exports = {extends: ['@commitlint/config-conventional']}" > commitlint.config.js

# 2.1 全局commitlint.config.js配置windows下暂时不知如何配置

# 3. 验证最新一条提交记录(必须添加上述配置,否则需要加上 -x "@commitlint/config-conventional")
commitlint -e

# 3.2 检查信息是否符合配置(linux shell 或者 windows git-bash)
echo "your commit message" | commitlint
git-cz 是一个简化版的commitizen+cz-conventional-changelog组合,提供了开箱即用的功能,默认使用Angular规范,默认模板不填写scope部分内容。
# 安装git-cz包
npm install -g git-cz

# 以后所有使用git commit的地方都用git-cz或git cz命令提交代码
# 交互式使用,兼容git commit 的参数,比如-a, --amend
git cz
NodeJS 项目直接使用 husky:
安装@commitlint/cli和@commitlint/config-conventional这两个包(建议安装到全局,这样所有项目都可以用):
然后在 package.json 添加 husky 配置:
{
  "husky": {
    "hooks": {
      "commit-msg": "commitlint -x @commitlint/config-conventional -E HUSKY_GIT_PARAMS"
    }
  }
}
然后使用git commit会触发husky的hook,检测commit记录是否符合规范。
其它项目,手动添加 git hook,仍然使用husky
# 全局安装husky
npm install -g husky

# 1. 安装commitlint命令行和验证使用的规则config-conventional
npm install -g @commitlint/config-conventional @commitlint/cli
项目中初始化husky配置
# husky 对项目进行初始化,创建目录.husky目录和脚本husky.sh
husky install

# 添加commit-msg hook,执行`npx commitlint --edit $1` 命令,对commit message进行检验
husky add .husky/commit-msg "commitlint -x @commitlint/config-conventional --edit $1"

# 可选,如果不用-x @commitlint/config-conventional,则需要项目中配置commitlint.config.js文件
# echo "module.exports = {extends: ['@commitlint/config-conventional']}" > commitlint.config.js文件
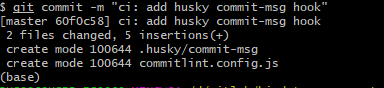
执行git commit时(注意空格),会进行命令输出

删除 husky 和 git hook
第4部分内容是在开发本地做的,因此需要禁止开发人员删除hook。
在 gitlab ci 中运行以下命令检测当前提交是否符合 conventional-changelog 规范:
image: node:latest

stages:
  - test

compile_job:
  stage: test
  script:
    - npm install "@commitlint/cli" "@commitlint/config-conventional" "commitlint-format-junit"
    - npx commitlint -x @commitlint/config-conventional -o commitlint-format-junit -f ${CI_COMMIT_BEFORE_SHA} > commitlint_result.xml
  artifacts:
    name: "$CI_JOB_NAME-$CI_COMMIT_REF_NAME"
    reports:
      junit: commitlint_result.xml
$CI_COMMIT_BEFORE_SHA 是 gitlab ci 的内置变量;将 lint result 输出为 Junit 格式,方便 Gitlab 在 merge request 的时候展示 lint 失败的结果,如下图所示。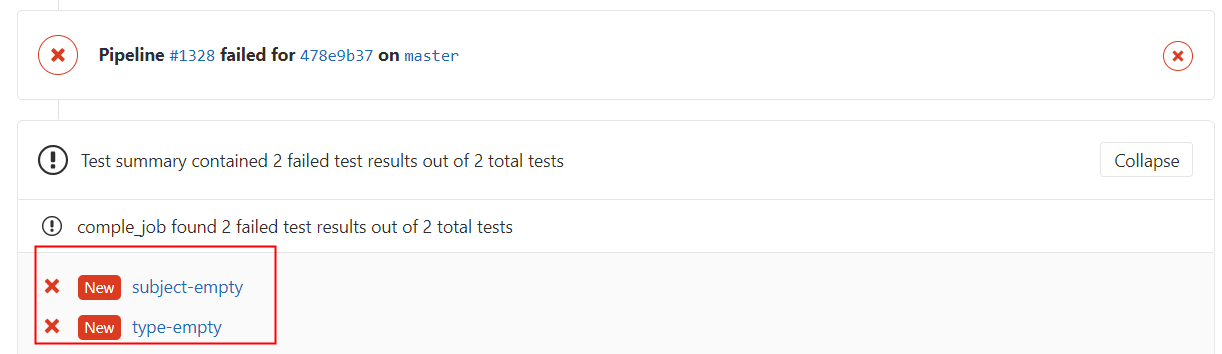
更适合在 CI 环境中运行,自带支持各种 git server 的认证支持,如 Github,Gitlab,Bitbucket 等等,此外,还支持插件,以便完成其他后续的流程步骤,比如自动生成 git tag 和 release note 之后再 push 回中央仓库,自动发布 npm 包等等。
大致的工作流如下:
release note,打 git tagCHANGELOG.md,npm publish等等(通过插件完成)npm install -g @semantic-release
版本号更新的逻辑:只有 feat 和 fix 提交才会触发版本升级
BREAKING CHANGE: 提交将会升级主版本号,版本由1.2.0升级到了2.0.0https://github.com/semantic-release/semantic-release/blob/master/docs/usage/ci-configuration.md#authentication
Gitlab 仓库需要配置 GL_TOKEN or GITLAB_TOKEN
| Step | Description |
|---|---|
| Verify Conditions | Verify all the conditions to proceed with the release. |
| Get last release | Obtain the commit corresponding to the last release by analyzing Git tags. |
| Analyze commits | Determine the type of release based on the commits added since the last release. |
| Verify release | Verify the release conformity. |
| Generate notes | Generate release notes for the commits added since the last release. |
| Create Git tag | Create a Git tag corresponding to the new release version. |
| Prepare | Prepare the release. |
| Publish | Publish the release. |
| Notify | Notify of new releases or errors. |
analyze commits with conventional-changelog
preset使用 angular 形式的commit规范;generate changelog content with conventional-changelog
通过conventional-changelog插件,生成从上个release到现在的变更信息。
preset使用 angular 形式的commit规范;Create or update a changelog file in the local project directory with the changelog content created in the generate notes step.
创建或更新changelog文件(默认路径为 CHANGELOG.md)
@semantic-release/git和@semantic-release/npm共用,则其位置必须在最前面。skip ci commit 信息跳过 CI )['CHANGELOG.md', 'package.json', 'package-lock.json', 'npm-shrinkwrap.json']配置,.releaserc
{
  "plugins": [
    ["@semantic-release/git", {
          // 配置哪些文件会被 add 推送回仓库
          "assets": ["Dockerfile", "./build/userservice.yaml","./build/version.md", "CHANGELOG.md"],
          // 自定义 commit 信息的格式
          "message": "chore(release): ${nextRelease.version} [skip ci]\n\n${nextRelease.notes}"
     }
    ],
  ]
}
publish a GitLab release
默认会通过 CI_API_V4_URL内置的环境变量识别 Gitlab 的地址
{
    "plugins": [
        "@semantic-release/commit-analyzer",
        "@semantic-release/release-notes-generator",
        "@semantic-release/changelog",
        "@semantic-release/git",
        ["@semantic-release/gitlab", {
            "assets": [
                {"path": "README.md", "label": "CSS distribution"}
            ]
        }]
    ]
}
assets 字段
| Property | Description | Default |
|---|---|---|
path |
Required, unless url is set. A glob to identify the files to upload. |
- |
url |
Alternative to setting path this provides the ability to add links to releases, e.g. URLs to container images. Supports Lodash templating. |
- |
label |
Short description of the file displayed on the GitLab release. Ignored if path matches more than one file. Supports Lodash templating. |
File name extracted from the path. |
type |
Asset type displayed on the GitLab release. Can be runbook, package, image and other (see official documents on release assets). Supports Lodash templating. |
other |
filepath |
A filepath for creating a permalink pointing to the asset (requires GitLab 12.9+, see official documents on permanent links). Ignored if path matches more than one file. Supports Lodash templating. |
- |
execute custom shell commands.
配置(.releaserc)
{
  "plugins": [
    "@semantic-release/commit-analyzer",
    "@semantic-release/release-notes-generator",
    ["@semantic-release/exec", {
      "verifyConditionsCmd": "./verify.sh",
      "publishCmd": "./publish.sh ${nextRelease.version} ${branch.name} ${commits.length} ${Date.now()}"
    }],
  ]
}
生命周期
| Step | Description |
|---|---|
verifyConditions |
Execute a shell command to verify if the release should happen. |
analyzeCommits |
Execute a shell command to determine the type of release. |
verifyRelease |
Execute a shell command to verifying a release that was determined before and is about to be published. |
generateNotes |
Execute a shell command to generate the release note. |
prepare |
Execute a shell command to prepare the release. |
publish |
Execute a shell command to publish the release. |
success |
Execute a shell command to notify of a new release. |
fail |
Execute a shell command to notify of a failed release. |
update version strings throughout a project.
修改特定文件中的版本号信息。
配置
{
  "plugins": [
    "@semantic-release/commit-analyzer",
    [
      "@google/semantic-release-replace-plugin",
      {
        "replacements": [
          {
            "files": ["foo/__init__.py"],
            "from": "__VERSION__ = \".*\"",
            "to": "__VERSION__ = \"${nextRelease.version}\"",
            "results": [
              {
                "file": "foo/__init__.py",
                "hasChanged": true,
                "numMatches": 1,
                "numReplacements": 1
              }
            ],
            "countMatches": true
          }
        ]
      }
    ],
    [
      "@semantic-release/git",
      {
        "assets": ["foo/*.py"]
      }
    ]
  ]
}
说明:
semantic-release 是最后进行执行,因为会需要将CHANGELOG等变更文件推回 git 仓库;semantic-relase 执行镜像跟项目的构建镜像不会是一个镜像;因此:
semantic-release 的dry模式,区分release/snapshot,先生成版本号;semantic-release 变更文件推回git仓库,并创建 Git Tag;.releaserc配置commit-analyzer, release-notes-generator, npm, github,{
"plugins": [
"@semantic-release/commit-analyzer",
"@semantic-release/release-notes-generator",
"@semantic-release/changelog",
"@semantic-release/git"
]
}
.gitlab-ci.yml 配置(gitlab-runner运行环境为powershell)# lint 过程用于检测 commitlint 结果
# release 过程用于自动化产生 git tag 和 CHANGELOG.md
stages:
- lint
- build
- deploy
- release
commitlint:
stage: lint
# node:lts 镜像并包含 npm install -g @commitlint/cli @commitlint/config-conventional commitlint-format-junit
# @semantic-release @semantic-release/gitlab @semantic-release/git @semantic-release/changelog @semantic-release/exec
image: ${GIT_NODE_IMAGE}
script: |
if [ "${CI_COMMIT_BEFORE_SHA}" = "0000000000000000000000000000000000000000" ]; then
npx commitlint -x @commitlint/config-conventional -f HEAD^
else
npx commitlint -x @commitlint/config-conventional -f "${CI_COMMIT_BEFORE_SHA}"
fi
echo "===${CI_COMMIT_REF_NAME}===${CI_COMMIT_BRANCH}"
# --dry-run 模式,预先生成版本号,区分 release / snapshot
if [ "${CI_COMMIT_REF_NAME}" == "master" ]; then
npx semantic-release --dry-run --no-ci
echo "VERSION_VAR=`cat VERSION`" > build.env
cat build.env
else
echo "VERSION_VAR=SNAPSHOT-`cat VERSION`-`date "+%Y%m%d-%H%M%S"`" > build.env
cat build.env
fi
# 通过环境变量传递版本号
artifacts:
reports:
dotenv: build.env
build:
stage: build
image: ${MKDOCS_IMAGE}
# 构建版本制品,并上传制品库
script:
- mkdocs build
- ls -all ./
- tar -zcvf helpdoc-${VERSION_VAR}.tar.gz site
- curl -v --user 'admin:admin123' --upload-file helpdoc-${VERSION_VAR}.tar.gz http://172.16.1.217:8081/repository/static/helpdoc/helpdoc-${VERSION_VAR}.tar.gz
artifacts:
paths:
- helpdoc-*.tar.gz
expire_in: 1 hour
deploy:
stage: deploy
# 通过 SSH 部署到机器
image: ${SSHPASS_IMAGE}
script:
- sshpass -p ${NODE_125_PASSWD} scp -o StrictHostKeyChecking=no helpdoc-${VERSION_VAR}.tar.gz root@${NODE_125_IP}:/tmp
- sshpass -p ${NODE_125_PASSWD} ssh -o StrictHostKeyChecking=no root@${NODE_125_IP} "cd /tmp && rm -rf site && tar -zxvf helpdoc-${VERSION_VAR}.tar.gz && rm -rf /home/experiment/web_ai_education/nginx/html/help/ && mv site /home/experiment/web_ai_education/nginx/html/help/ && cd /home/experiment/web_ai_education/nginx/ && ./sbin/nginx -s reload"
release:
stage: release
image: ${GIT_NODE_IMAGE}
script:
# 生成版本号,更新CHANGELOG,并推回仓库
- npx semantic-release
only:
- master
dependencies: []
效果图示例(master分支构建流水线):

70w 在线人数的弹幕系统
带宽压力
假如说每3秒促达用户一次,那么每次内容至少需要有15条才能做到视觉无卡顿。15条弹幕+http包头的大小将超过3k,那么每秒的数据大小约为8Gbps,
通过查阅资料,http gzip压缩比率可以达到40%以上(gzip比deflate要高出4%~5%)
弹幕的 Response 结构简化,降低传输字节数
内容排列顺序优化,将字符串和数字内容放在一起摆放,增加压缩比;
频率控制
带款控制:通过添加请求间隔参数(下次请求时间),保证客户端的请求频率服务端可控
根据了解腾讯云的弹幕系统,在300人以下使用的是推送模式,300人以上则是采用的轮训模式。
促达机制,推送 vs 拉取
Long Pulling
减少轮询次数,低延迟,浏览器兼容性较好
服务器需要保持大量连接
WebSocket:
较少的控制开销(相对于 HTTP 请求每次都要携带完整的头部),更强的实时性;
每个客户端使用一个持久化的连接
Long Polling 能发现连接异常的最短间隔为:\(min(keepalive\_intvl, polling\_interval)\)
Websockets能发现连接异常的最短间隔为:\(min(keepalive\_intvl, client\_sending\_interval)\)
弱网情况下 Websockets 其实已经不能作为一个候选项
即使 Websockets 服务端已经发现连接断开,仍然没有办法推送数据,只能被动等待客户端重新建立好连接才能推送,在此之前数据将可能会被采取丢弃的措施处理掉;(没有缓存/入库?)
在每次断开后均需要再次发送应用层的协议进行连接建立。
将逻辑较为复杂、调用较少的发送弹幕业务与逻辑简单、调用量高的弹幕拉取服务拆分开来。
拉取弹幕
数据更新的策略是服务会定期发起RPC调⽤从弹幕服务拉取数据,拉取到的弹幕缓存到内存中
缓存:按照时间进行分片(采用 RingBuffer),最多保留60秒的数据,只保留了尾指针,它随着时间向前移动,每⼀秒向前移动一格
读请求:缓冲环会根据客户端传入的时间戳计算出指针的索引位置,并从尾指针的副本区域往回遍历直至跟索引重叠,收集到一定数量的弹幕列表返回
写操作是单线程,读和写是相反的方向,⽽决定读和写的位置是否出现重叠取决于index的位置,
保证读操作最多只能读到30秒内的数据,因此缓冲环完全可以做到无锁读写
发送弹幕
用户一定时间能看得过来弹幕总量是有限
对弹幕进行限流,有选择的丢弃多余的弹幕